
heating mat optional
STARTING YOUR SEEDS:
Seeds love humidity. If seeds were people, they’d be Floridians…or they’d say things like “Kuala Lumpur is nice this time of year.” You’d never catch seeds vacationing in Nevada or New Mexico – it’s simply too durn dry for them. If you happen to live in Kuala Lumpur then you probably don’t need to do much to start your seeds; in fact, you probably need a dehumidifier just keep you seeds dry. We are of course talking about seeds and seedlings, not plants. Plants do love humidity – but so does fungus…so we’re going to pot the seedlings when they’re mature enough.
This site is called Hydroponic Basics – so we’re going to keep the instructions easy for now.
We need to create some conditions for our seeds that will allow them to mature fully. Plants can be retarded if they do not have what they need when they need it. In fact, it’s crucial for their survival to react to environmental conditions. If conditions are perfect, they will mature fully.
First, let’s gather our supplies:
- A seedling starter tray to hold the tray inserts.
- A seedling starter tray insert to hold the starter plugs.
- We’ll need some hydroponic starter plugs.
- A starter tray dome.
- A clean spray bottle with purified water.
- A direct light source.
- [OPTIONAL] root heating mat (for cooler climates)
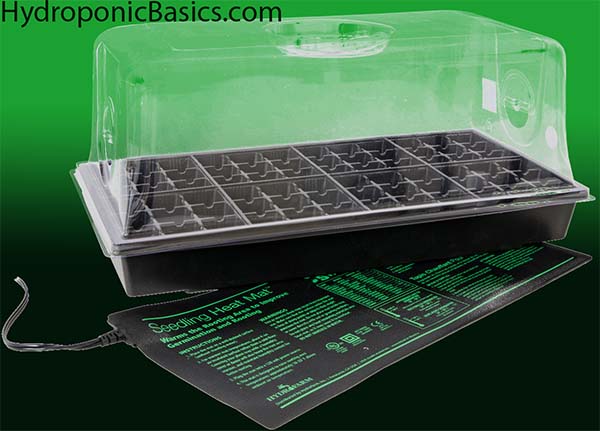
Your we’re all done and have put the mini-greenhouse together, it should look something like the one in the picture above.
Now that we have all the pieces/parts, we’re going to assemble it all like the picture and add our starter plugs.
LAYOUT:
The size of your tray, the number of seeds you want to start, and how long you’re going to leave them before potting…and the type of plant are important enough to know ahead of time.
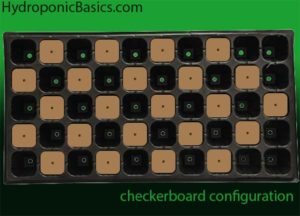 If you’re not sure how long you’re going to leave them, but you know you’re going to start about 20 plants, then you can space your plants out like a checkerboard.
I like to pot my plants later, so I tend to keep them out of the corners, if possible.
If you’re limited on space in your grow-room (or whatever area you’re using for your plants) you’ll want to plan your yield and plant your seeds accordingly. If you have more room, you can stagger your planting and maintain a steady yield all year long.
LIMITED SPACE:
When your seedlings are ready to pot, they’ll need to vegetate for a little while until they’re ready to flower. Unlike planting seeds outside where the sun controls the amount of light your plants get each day, you are likely going to control the amount of light your plants get with HID lighting. So, in a limited space grow room, you’ll need to “veg” your plants in the same room you flower. We’ll get into vegging your plants in another post – but they need about 16 to 24 hours day of light.
MORE SPACE:
If you have the space to spare, then you can have a seed-starting section, a vegetative space, and a flowering room. If this is the case, then by all means, feel free to stagger the germination of your seeds. For example, if you have enough room for 40 plants with a 16 week seed to table grow-cycle, you can break it down into eighths and maintain a steady yield year round. At the end of week sixteen you’ll begin the process of harvesting 5 plants, moving 5 plants from veg to flower, and starting 5 new seeds. Of course, this is if everything goes perfect for you. HAHA! Sorry, it’s just that it won’t go strictly to plan…but that’s okay. You’re learning. Heck! I’m still learning!
PLANTING SEEDS:
All of the starter plugs like Root Riot, Rapid Rooter come with holes to put seeds or clones. Take one seed and one plug and put them together the way nature intended. Place the seeded plug into one of the empty tray insert sleeves. Repeat until you have all the plugs plugged that you want.
Mist your plugs with the spray bottle. Then spray the inside of your dome and place dome on top of tray. Make sure that at this point your vents (if you have them) are closed. We’re going to build up some humidity before we open the vents a smidge.
PLACING YOUR GREENHOUSE:
If you live in a colder environment, place your warming mat directly under your light source. For the light source, you don’t need anything like an HID (high intensity discharge) light, it just needs to be bright enough to reach all your seedlings and vegetate them. Personally, I like using a 300 watt CFL focused with a reflective shade. I get mine from Home Depot and they’re less than $20.
Now, if you’re in warmer climate, you won’t have to worry about the warming mat – GOOD FOR YOU!
Now, place the greenhouse directly under the light source. Make sure the light source does not physically touch the greenhouse or is so close that it’s at risk of melting your tray’s dome. After a couple hours you should see the greenhouse effect begin to form.
After about a day (provided the greenhouse effect is present) crack your vents open just a smidgen. You’ll want to make sure you don’t open it too far. You want your seeds to breathe, but you don’t want to lose the greenhouse effect. Open vents a little bit at a time waiting a few hours between intervals and get them to the point where it’s dry around the vents but still humid everywhere else. Boom! Perfect!
MAINTAINING YOUR GREENHOUSE:
Maintaining your greenhouse is easy. About twice a day lift up on the dome and spray the inside of the lid. You don’t have to go crazy with it…just a spritz.
When your seedlings are big enough, you can pot them by pulling the entire plug up and potting it starting plug and all.
Speak Your Mind